Showing posts with label art. Show all posts

Tuesday, October 18, 2011

Dusk at noon

So, I've been doing a lot of job hunting lately, and feeling like a total one-trick pony with my looks.  Hair down, three color gradient eyes, neutral lips.

The majority of my professional clothes are gray or black for pants, and red, purple or teal for tops.

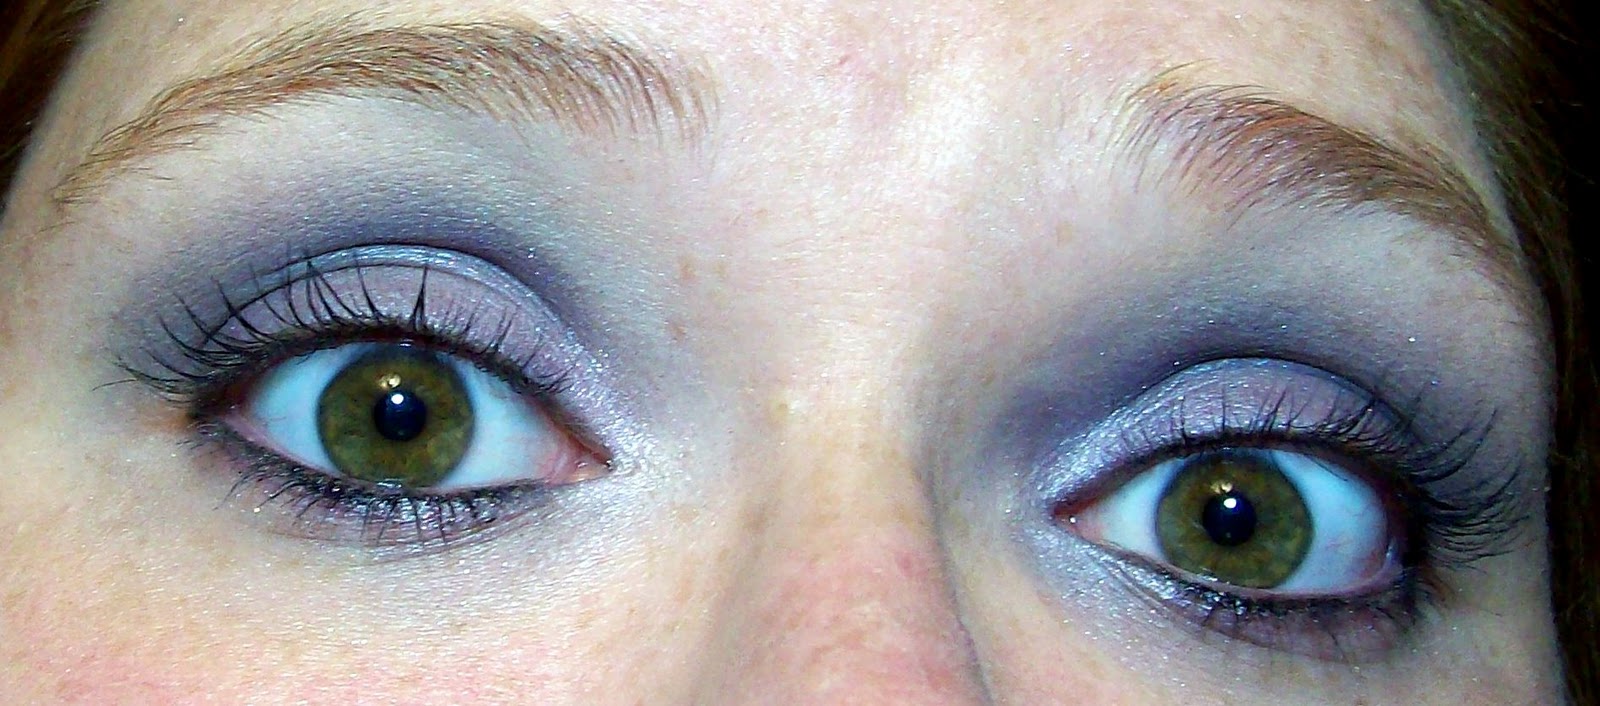
Yesterday was a dusky purple top with dark gray pants.  What better excuse to try out a daytime smoky eye than that?


Start with a clean, dry face.  I just touched up with a baby wipe and a soft, dry cloth, as I had taken a shower a couple of hours prior.


Top to bottom: Madd Style Cosmetix Bubble Gum Crisis, Gunslinger Girl, Glitter and Doom, and UiS Dark Gray.  Brushes top to bottom: small shader, medium shader, small pencil, with large blending brush on the side.


Accent colors: MSC Birf'day suit for orbital highlight, MSC Mudd Slinger for brows.


L to R: Almay Smart Shade Anti-Aging Foundation, Korres Quercetin and Oak Anti-Aging Primer, OCC Lip Tar in NSFW, Estee Lauder High Definition Volume Mascara, MSC Pop Rock Uber Boss Lip Gloss, MSC Effin' Perfektion Powder.

NOT PICTURED: NYX Shadow Base in White, ELF Under-eye concealer, Benefit Stay Don't Stray eye primer, black kohl pencil.


Line your waterline with a black pencil of choice.


Blink hard.  The purpose of this is to spread the liner to your top waterline, eliminating the need to attempt to line it yourself.  I always poke myself in the eye when I try to do it any other way.


Li-ine eyes!


Next pat on some of your NYX base.  You want to use a heavier amount than I generally recommend, because you want the colors to pop.


Blendy blendy!  Apply Bubble Gum Crisis to your ducts.


Pat Ginslinger girl on in an almost pyramid shape.


Fill the rest of the lid in with Glitter and Doom.


Blend the purples gently with your fingers, and then using your small pencil brush, draw on your dark gray.


Blend that inward with the fluffy brush using a short, fast flicking motion. 


Blend any other spots that may need it gently with your fingers.


Touch up with a wet wipe for fall out.


All cleaned up!


Lashes, highlight and brows!


Put on the rest of your face, and you're ready to go!


Saturday, October 15, 2011

The Witching Hour

I figured since the moon is full, something witchy should this way come.

I have a piece of fabric that I love love love to death.  It's a simple witch, with a dark blue dress.  The colors are inspiring, and so I figured hell... inspiration from dog coats is weird, inspiration from a piece of fabric is not.


As ALWAYS, start with a clean, dry face.


Then assemble your tools and products! UDPP, NYX base in white, MSC: Jubilee, Dark Crystal Citrine, Birf'day Suit, Mudd Slinger Unicorns and Glitter, Never Ending Summer, and Ruby. Soft brown liner for waterline, Awesome Sauce, and Physician's Formula PlentyFULL mascara in black brown.


Something I should mention... I don't always use all of the brushes I pull.  However, I never know what I'll need when I'm doing the look, so I grab a good assortment for what I  *MIGHT* use.


One eye with the NYX white base blended, the other with it NOT blended.

\

Blendy blendy!


Line your waterline with a plain dark brown liner. DO NOT USE WATERPROOF UNLESS YOU WANT BROWN EYE BOOGERS FOR DAYS.  Not that I know from experience or nuttin.


Apply Never Ending Summer to the inner half of your lid.


Then add Citrine from the Dark Crystal collection, overlapping the middle third with the NES.


You want it to look like this when you're done, before you blend.


Blend with super fluffy angle brush.  Since you're going yellow into yellow, you don't really have to worry about muddying anything up.


Pull out your Dark Crystal Ruby.  Tap some out so you can saturate your brush, but not over do it.


Use a crease brush - I used my white Sonia Kashuk - and blend from the outer corner up to the crease, and across the orbital bone with swift back and forth motions.  Use your fingers to further blend down into the Yellows.


Next up, you want to like the top AND bottom lash beds with your Jubilee, mixed with Awesome Sauce for foiling.


Like so!  Note that it's a very, very fine and thin like.  You want the main focus to be on your lids, not your lash line.


Cheese it up, baybee!!!!


Highlight with Birf'day Suit.  You can't really tell it's there, except for where it blends down into the Ruby on your orbital bone.


Ta Daaa!!!!  With glasses!  Please also ignore the roots I have goin on in my hair, there. I have since re-colored and the gray is gone! Yay!


Closed eyes!

Try this look out, and then fan the MSC page on Facebook!  Show us what you've got!

As always, loves... stay warm and STAY MADD!

Friday, September 30, 2011

September Send-off: Berry Lovely.

A challenge was recently issued.  The task? To re-create a look done by Ronnie over at Bows and Curtseys.

Being a new Madd Model, I find that challenges like these are perfect for creating tutorials.  They allow me to put my own aesthetic spin on things, while really testing out the product that I represent for the purpose of teaching and of course, in a way, selling.

Cranberry shadows are my favorite, and always have been.  It's only recently that I've been brave enough to attempt pulling them off, and I've found that like most hurdles, once you jump in, it's pretty cakey from there on.


As always, we're going to start out with our tools.  Now, you may have noticed that I don't always use every brush I start out with, or that I occasionally add in a brush I didn't originally picture.  You have to bear with me - organization is not my forte.


Top to bottom, left to right pigments (Since the rest is pretty self explanatory,): Mudd Slinger, Dark Crystal Ruby, Up in Smoke medium gray, Young Blood, UiS dark gray, Birf'day Suit, UiS black.


Prime those peepers.  I'm in the middle of a wicked allergy attack, so my entire face is puffier than normal.  makes getting primer even in all those crevices quiiite interesting.


Primed and puffy!


Line away!  DO THIS NAO.  You don't want to muddy or smudge your top lid later.  A light line is fine, you're really only using it as a guide.


"Happy little trees..."  Only, you know, different.


Now, neither Ruby or Young Blood were berry enough for me, so I mixed them 1:1 to get the sultry shade I was aiming for.


Inner halves get the berry coloring.  Again, it's a unique experience to try and saturate an area with <x,y,z> when it's puffed to twice it's size and wrinkled from the swelling.  If you're going to be like me, just resign yourself to popping a benadryl and blinking a lot to make sure you've gotten your color even.


Now the medium gray goes on.

Just a thin stripe of it needed, for blending into...


The dark gray.


See that nice color gradient?  OCD Jalackie is happy.


Now polka dot your black on.  I use dots, some people do dashes, some outline and blend in... whatever your preference, always remember THE UTMOST IMPORTANT THING WHEN WORKING WITH BLACK:  It's always better to build than to wipe.


Moar black.


Using the fluffy brush above, I blended the black well, taking care to maintain the gradient look while still getting a very defined black color on the eyelid.  Then I used my liquid black liner and lined my top lid.


Birf'day Suit to highlight on the orbital bone!


Mudd Slinger for my brows, and Physician's PlentiFULL mascara in brown black (because I wasn't thinking. Though, the brown black didn't turn out too bad with this look.)


Ta Daaa!!!!


Oops, lash clump.  We'll consider this photo the blooper reel.


With glasses!


Peekaboo!

All in all, I'd say it was a success, doubly so considering it happened without any blood in my caffeine sys... err, wait.  Anyway.  It happened early in the morning. =P

This is definitely a clear candidate for the "intermediate" category, simply for the use of a true black in general.  Black pigment, loose or pressed, is intimidating.  Not only do you risk looking like you've stepped out of the Thriller video, you also risk turning everything around you black, from the toddler to the mini-fridge.

That said, step up and TRY IT.  You'll never graduate to intermediate if you're a novice if you never try. <3

As always, my darlings, Stay Madd!